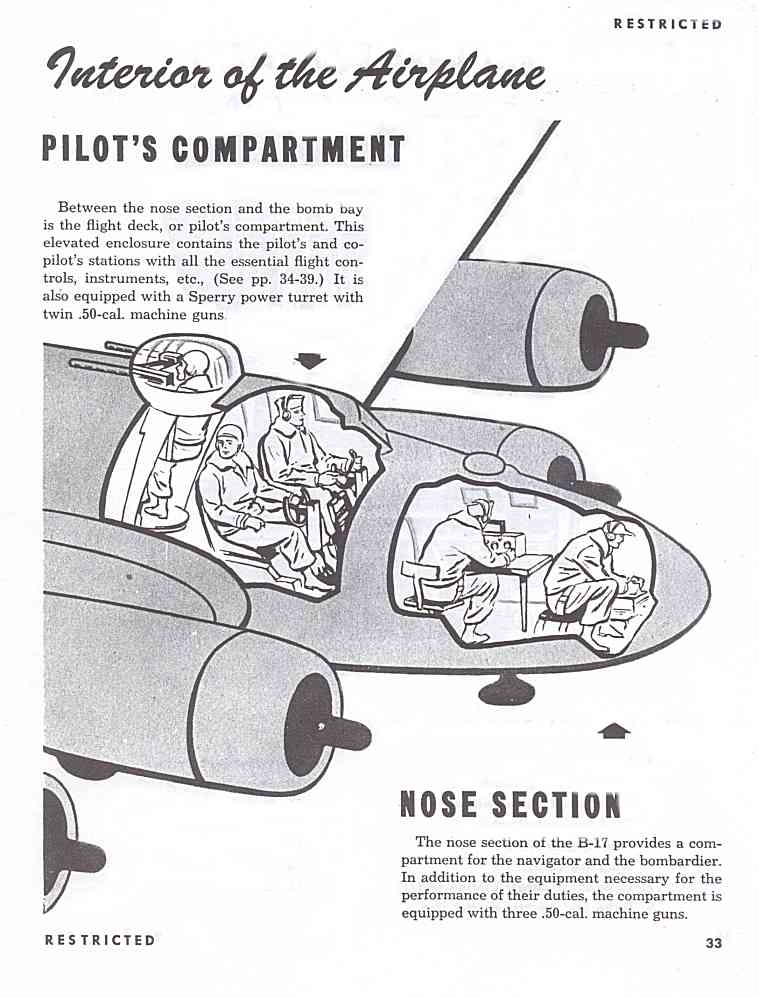
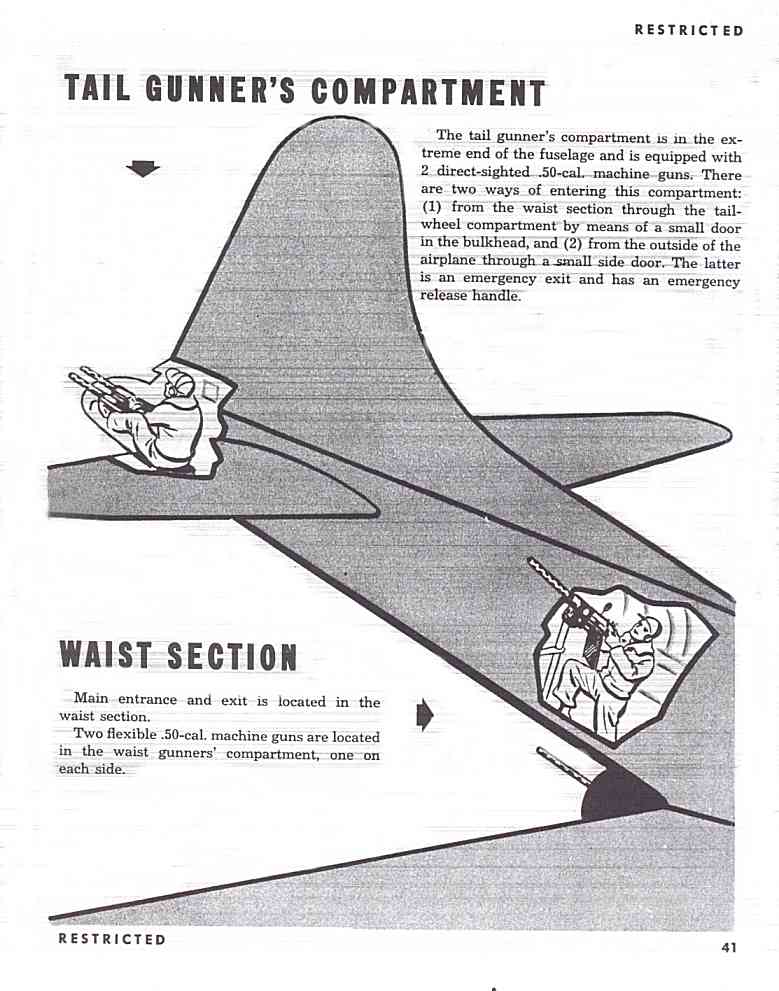
Crew Compartments
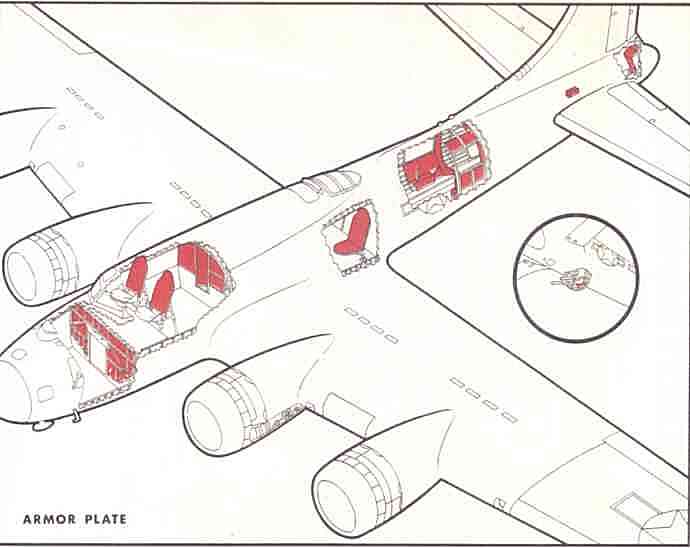
Armor
Protective armor plate, mounted on rubber cushions, is installed at crew stations throughout the airplane.
The pilot, copilot and radio operator are protected by armor plate on the backs of their seats.
The bombardier-navigator compartment contains armor plate on the bulkhead at the rear of the compartment.
Armor protection for the top turret operator is placed on the aft side of the bulkhead at the rear of the pilot's compartment.
The gunner's seat in the ball turret is made of armor plate.
Armor plate in the waist gunner's compartment is installed above, below, and to the rear of each side window.
Padded armor plates and bulletproof glass protect the tail gunner.
The autopilot Servo motors above the tailwheel are protected by armor at the side and bottom.
|
|
When you get into combat you will learn that your best assurance of becoming a veteran of World War II is the good, well-planned, and well-executed formation.
Formation flying is the first requisite of successful operation of the heavy bomber in combat. Groups that are noted for their proficiency in formation flying are usually the groups with the lowest casualty rates. Proper formation provides: controlled and concentrated firepower, maneuverability, cross-cover, precise bombing pattern, and better fighter protection.
Heavy Bomber Formations
Formation flying in 4-engine airplanes presents greater problems than formation flying in smaller aircraft. The problems increase in almost direct proportion to the airplane's size and weight. In the B-17, relatively slower response to power and control changes require a much higher degree of anticipation on the part of the pilot. Therefore you must allow a greater factor of safety.
Violent maneuvers are unnecessary and seldom encountered. Close flying becomes an added hazard which accomplishes no purpose and is not even an indication of a good formation. Bear in mind that it is much more difficult to maintain position when flying with proper spacing between airplanes than with wings overlapping.
Safety first is a prerequisite of a good formation because a greater number of lives and a larger amount of equipment is in the hands of the responsible pilot in a large 4-engine airplane.
Clearance
In flying the Vee formation, aircraft will not be flown closer to one another than 50 feet from nose to tail and wingtip to wingtip. Maintain this horizontal clearance whenever vertical clearance is less than 50 feet, thus providing a minimum of 50 feet clearance between wingtips as well as the line of nose and tail under all formation flying conditions.
Taxiing Out
At H hour, all ships start engines and stand by on interphone frequency. The formation leader checks with all planes in his formation. After this he calls the tower and clears his formation for taxi and takeoff instructions. As he taxies out, No. 2 man follows, then No. 3, etc., each airplane taking the same place respectively on the ground that it is assigned in the air. As soon as the leader parks at an angle near the end of the takeoff strip, the other aircraft do likewise. At this point all aircraft run up engines and get ready for takeoff. The leader makes certain that everyone is ready to go before he pulls out on the takeoff strip.
Takeoff
Formation takeoffs should be cleared from an airdrome in a rapid and efficient manner. Individual takeoffs will be made. Therefore, the following method is suggested:
The leader goes into takeoff position and takes off at H hour. No. 2 man starts pulling into position as soon as the leader starts rolling. When the leader's wheel leaves the runway, No. 2 starts taking off. (The time lapse is about 30 seconds.) The leader flies straight ahead at 150 mph, 300-500 feet per minute ascent, for one minute plus 30 seconds for each airplane in the formation. He levels off at 1000 feet above the terrain to prevent high rates of climb for succeeding aircraft. (Cruise at 150 mph.)
As soon as the leader has flown out his exact time, he makes a 180° half-needle-width turn to the left. The second airplane in formation assumes the outside or No. 2 position, while the third airplane assumes the inside or No. 3 position. The leader of the second element assumes position on the outside of the formation and his elements assemble on him in the same manner.
3-Airplane Vee
The 3-airplane Vee is the standard formation and the basic one from which other formations are developed. Variations of the Vee offer a concentration of firepower for defense under close control with sufficient maneuverability for all normal missions, and afford a bombing pattern which is most effective.
Flight of 6
A formation of 6 aircraft is known as a flight or squadron, which is composed of two 3-airplane Vees. At least 50 feet vertical clearance will be maintained between elements in a flight and at least 50 feet horizontal clearance between the leader of the second element and wingmen of the first element.
From this basic squadron formation of 6 aircraft, the group, made up of 12 to 18 aircraft, is formed. Second or third flights will be echeloned right or left, up or down, with a vertical clearance of 150 feet and a horizontal clearance of 100 feet.
The high squadron flies 150 feet above and 100 feet behind the lead squadron with its second element stacked down and echeloned to the outside of the formation.
The low squadron flies 150 feet below and 100 feet behind the lead squadron with its second element stacked down and echeloned to the outside of the formation.
Flights may be placed in the high or low positions, as desired by the leader, by order over radio and receipt of acknowledgment. The flights simply go up or down in their respective positions. In this formation the positions of individual airplanes in each element will be those always flown in the 3-airplane Vee.
With but small variations, this basic formation can be changed to the combat formations used overseas. It is the job of training to teach a basic formation which can be readily understood and flown by students and easily adapted to tactical use.
Spacing of Wing Positions
It is particularly important for the leader to avoid violent maneuvers or improper positions which will cause undue difficulty for the wingmen.
The spacing of the wing positions in Vee formation is:
Turns in Vee formation will maintain the relative position of all airplanes in the element. In other words, the wing airplanes will keep their wings parallel to the wings of the lead airplane and on the same plane.
Trail
A formation is in Trail when all airplanes are in the same line and slightly below the airplane ahead. The distance between airplanes will be such that the nose of each succeeding airplane is slightly to the rear of the tail of the airplane ahead. If this distance is too great the propeller wash of the airplane ahead will cause difficulty in maintaining position. This formation will be used only when there are from 3 to 6 aircraft involved for changing the lead, for changing wingmen, and for peel-off for landing (optional).
Changing Wing Position
When changing from Vee to Trail, the wingman into whom a turn is made while in Vee assumes the No. 2 position in Trail, while the outside man is in the No. 3 position in the Trail. When returning from Trail to Vee, the No. 3 man in Trail assumes the inside position of the Vee. Remember this, for it is the procedure for changing from Vee to Trail and from Trail to Vee. Also, it provides a method for changing wing positions in a Vee formation.
It is often desirable for a leader to change the wing position of his formation, i.e., to reverse the right and left positions. If this maneuver is not executed properly in accordance with a pre-arranged plan, there is danger of collision. A safe plan is for the leader to announce on the radio that the formation will go into Trail on his first turn. If the turn is executed to the right, it will result in the inside man, or No. 2 wingman, being No. 2 in the Trail, and the outside man, or No. 3 wingman, being No. 3 in the Trail when the turn is completed. The leader will then announce that the formation will re-form in Vee when the Trail executes a turn to the right. This second turn to the right will re-form the Vee with wingmen reversed.
As stated above, this will result in the No. 2 man of the Trail assuming the outside position of the Vee, and the No. 3 man of the Trail assuming the inside position of the Vee. It is desirable for the leader to designate the ultimate position each wingman will assume prior to each turn in order to ensure complete understanding.
Changing Lead
Formation will go into Trail from the usual 90° turn to the right or left. The leader of the formation will make a 45° turn to the left and fly that heading for approximately 20 seconds or until such time as a turn back will place him in the rear of the formation. When the No. 1 airplane starts his 45° turn, the No. 2 plane in the Trail immediately becomes the leader of the formation and continues to fly straight ahead. At the end of 20 seconds, or thereabouts, the original leader turns back and takes up the No. 3 position in his element, or No. 6 position if in a flight of 6, and notifies the new leader that the maneuver is complete.
Landing
The formation will approach the field at an altitude of 1500 feet above the terrain in Vee in such a direction that two 90° turns, either right or left, can be made to bring the formation heading upwind in line with the runway on which the landing is to be made. The formation will go into Trail, stepped down, on the first 90° turn and the leader will order gears down as soon as the Trail has been formed, at which time the checklist may be started. The leader will then fly up to the runway and peel off to the left when he is directly over the spot on which he intends to land. Each succeeding plane will peel off without interval spacing achieved on first turn. The leader will put down 1/3 flaps, retard throttles, and make a continuous power let-down with just enough base leg to enable him to make a straight-away approach rather than a landing out of a turn, other ships in the formation spacing themselves and accomplishing the same approximate pattern of let-down and approach as their leader. There will be no more than 3 ships on the runway at the same time (one turning off, one midway, and one just landing).
Landing from Vee
The formation will approach the airdrome at an altitude of 1500 feet above the terrain into the wind up the landing runway, at which time the wheels will be ordered down by the leader and checklist accomplished. The second element will maintain assigned position echeloned to the right. The leader will call No. 3, when over the edge of the landing runway, to peel off, No. 3 acknowledging by peeling off. No. 1 follows; No. 2 following No. 1; No. 6 following No. 2 and so on. Approach and landing accomplished as outlined.
A Group Landing from Vee
The group will approach the airfield in an echelon of flights to the right. This echelon of flights will be accomplished by order of the leader by radio and acknowledged by the leader of flight indicated. The leader will have the formation with high squadron (flight) in second position, low squadron in third position still stacked down in low position, relative to leader's flight, but maintaining position on high squadron. Each flight will land individually, the lead flight landing first as previously outlined. The high and low flights will complete a 360° turn and land in turn as shown by diagram.
Conclusion
In conclusion, it should be stated that a good formation is a safe formation. An air collision is the result of carelessness or lack of clear understanding between members of the formation. lf the simple rules, as outlined, are followed explicitly, there is no excuse for mistakes in the air. A mistake in formation flying may result in costly, irreparable loss of lives and equipment.
It should be reiterated that it is not a display of skill to fly too close; it is a display of bad judgment and lack of common sense.
Your airplane was designed to operate just as well at high altitude as at low altitude.
Your body wasn't!
All organisms require oxygen to support life. At ground level you get plenty of oxygen from the surrounding air, which is packed down by the weight of the air above it.
As you go up there is less air above you. Therefore the air you breathe becomes thinner, your body is getting insufficient oxygen, and you begin to lose efficiency. At some altitude -- varying with the individual -- you'll become unconscious, and then, unless you get some extra oxygen quick . . . that's all, brother!
Remember, when the pressure of the air you're breathing is less than the normal atmospheric pressure of 10,000 feet, you need extra oxygen.
Therefore, your airplane has an oxygen system to meet the requirements of your body and allow you to function normally.
The equipment is excellent, simple to operate, and safe for flights up to 40,000 feet. But it is not safe unless you understand it thoroughly and strictly observe the rules regarding its use. You can't take shortcuts with oxygen and live to tell about it!
The lack of oxygen, known as anoxia, gives no warning. If it hits you, you won't know it until your mates revive you from unconsciousness, if they can. Therefore, you must check the condition and operation of your equipment with extreme care, and continue to check it regularly as often as possible during flight.
Your oxygen mask is an item of personal issue. Take care of it. It's as important as your life.
Before you use the mask in fight, have it fitted carefully by your personal equipment officer, or his qualified assistants. They will see that you have the right size, that it fits perfectly, and that the studs to hold it are properly fixed to your helmet.
Bring it in for re-checking whenever necessary. The straps will stretch slightly after a period of use. It's a good idea to have the fit re-checked regularly whether you think it needs it or not.
Draw the mask before each mission. Return it to the supply room afterward. Equipment personnel will check it for repair and cleaning. But don't assume that this procedure relieves you of the responsibility of your own regular inspection and care of the mask.
Before each mission, make the following checks on your mask:
General Tips:
Don't fall for the belief, common among less experienced flyers, that "night flying is no different from day flying." Night flying is different from day flying. Your vision at night is different because you are using a different part of your eye. Unless lights are properly grouped (as on runways) or easily identifiable (horizons, large cities, towns, etc.), your visual references are diminished considerably. Finally, when visibility is reduced and you have no clearly defined horizon, night flying is instrument flying.
Illusions in Night Flying
Night flying can be much more confusing than simple instrument flight through clouds. Probably many of the accidents and fatalities that occur in night flying result from the fact that pilots rely too much on their vision and other senses rather than on instruments.
The inexperienced pilot is continually looking for some light on the ground by which he can orient himself. Unless he is flying near a large city where there are enough lights to make a good pattern, this practice of trying to orient himself in relation to the terrain is extremely hazardous. Many experienced pilots can tell how they have mistaken a star for a light beneath them, or how they thought lights were moving past, when actually their plane was turning about the lights.
The reason for the particular confusion in night flying is that a pilot's eyes may deceive him. He does not have any definite horizon to use as a plane of orientation; he has only isolated points of light. His sensation may tell him that these light-points are in a completely different relationship. As a result, when the airplane does not react as he expects it to, he becomes completely confused. In addition, the inexperienced pilot usually forgets his instruments and is so busy looking around that he glances at the instrument panel only after he has become confused and is already in a bad situation.
The only solution for this is to watch the instrument panel, with only occasional glances out at the visual reference points. In night flying, use instruments as your major reference, and scattered lights only as a secondary reference.
Tips on Night Vision
Before flight don't subject your eyes to any bright lights: brightly lighted rooms, wing light beams, bright cockpit lights, etc.
Turn out all unnecessary cockpit lights; dim instrument panel lights.
Read instruments, maps, and charts rapidly; then look away. Use red light within the airplane whenever possible.
Lack of oxygen seriously impairs vision. At 12,000 feet without oxygen, for instance, night vision is only 50% efficient. Use oxygen from the ground up on all night flights to altitude.
Night Vision Precautions
Be sure that goggles, side windows, and wind shields are kept scrupulously clean. Scattered light on unclean surfaces reduces the contrast between faint lights and their background.
Be sure that all fluorescent lights, winglights, navigation lights, passing light, cockpit light, and individual instrument lights are in operating order.
Be sure that pilot, copilot, and engineer have individual flashlights.
Check radio operation and set proper frequencies. Your radio is especially important at night.
Know your field layout, the proper relationship of taxi strips to runways, etc. It's easy to become confused at night.
Takeoff
Obtain clearance from the tower before taxiing to the runway. Line up in the center of the runway and use runway lights for reference.
If visibility is poor and no horizon is visible, prepare to take off on instruments.
Maintain proper airspeed, but be sure you're climbing. It is imperative to hold a constant heading until you reach sufficient altitude for the turn.
Post observers at the side windows and top turret to give warning if you are turning into the path of other aircraft.
Remember that, for safety, 145 mph is the recommended climbing speed at night.
Don't start turns until you are at least 400 feet above the terrain. Don't reduce power until 200 feet altitude has been reached.
Night Landings
Taxiing Precautions
Ditching [landing on water] drill is the responsibility of the pilot. Duties should be studied, altered if necessary to agree with any modifications, memorized, and practiced until each member of the crew performs them instinctively.
The pilot's warning to prepare for ditching should be acknowledged by the crew in the order given here -- copilot, navigator, bombardier, flight engineer, radio operator, ball turret gunner, right waist gunner, left waist gunner, and tail gunner, i.e., "Copilot ditching," "Navigator ditching," etc.
Upon acknowledgment crew members remove parachutes, loosen shirt collars and remove ties and oxygen masks unless above 12,000 feet. When preparations for ditching are begun above 12,000 feet, main oxygen supply or emergency oxygen bottle is used until notification by the pilot. All crew members wearing winter flying boots should remove them. No other clothing should be removed.
Releases on life rafts should not be pulled until the plane comes to rest.
Beware of puncturing rafts on wing and horizontal surfaces after launching. The dinghies should be tied together as soon as possible.
Injured men should get first consideration when leaving the airplane.
Life vests should not be inflated inside the plane unless the crew member is certain that the escape hatch through which he will exit is large enough to accommodate him with the vest inflated.
When personnel are in dinghy, stock of rations and equipment should be taken by the airplane commander (or copilot). Strict rationing must be maintained. Flares should be used sparingly and only if there is a reasonable chance that they will be seen by ships or aircraft. Don't forget the Very pistol.
Lash the life rafts together.
Landing crosswind is recommended unless the wind exceeds about 30 mph, in which case land into the wind. In executing the crosswind landing, the pilot will line up with the lines of the crests, at any convenient altitude, adjust flaps, power settings, trim, and make the approach with a minimum rate of descent, with a minimum forward speed. Land on a crest parallel to the line of crests or troughs. Crabbing will be necessary to remain over the crest while making the approach.
Duties of the Crew
Crew Positions for Ditching
The positions illustrated should best enable crew members to withstand the impact of crash landings on either land or water. On water, 2 impacts will be felt, the first a mild jolt when the tail strikes, the second a severe shock when the nose strikes the water. Positions should be maintained until the aircraft comes to rest. Study them carefully.
Emergency equipment for use in the dinghy should be carried to crash positions. Any equipment carried free must be held securely during ditching to prevent injury.
Parachute pads, seat cushions, etc., should be used to protect the face, head, and back.
No procedure can be established which will fit all cases. The following is a summary of the steps which should be taken if time permits. The airplane commander will exercise his authority to alter this procedure wherever necessary.
Airplane Commander Will:
The Copilot Will:
The Bombardier Will:
The Engineer Will:
The Navigator Will:
Abandoning Airplane Following Crash Landing on Land
When an emergency develops and it becomes necessary to abandon the airplane in flight, there is no time for confusion or second guessing. Procedure of the entire crew in bailing out of the airplane must be almost automatic. Each crew member must know:
As airplane commander, your first responsibility is to be sure that your crew is thoroughly trained, by regular ground drill, in the proper procedure for bailing out of the B-17.
Before taking off on any flight make absolutely sure that:
Duties of the Crew